In this web era, building highly dynamic, interactive and attractive user interfaces is crucial. When your web page is interesting, the user likes to spend more time on it, ultimately leading to improved ranking on search engines. You can find numerous libraries and tools to achieve that, but React stands out the most.
In this article, we will learn what React is and how to get started with it. In the subsequent articles, we will explore it more and try to use it in our web pages.
What is React?
React is a powerful and popular JavaScript library that helps you build dynamic web experiences easily. It allows you to build complex UIs with small and isolated pieces of code known as Components.
Imagine your website is built with the LEGO blocks. Each block has its own functionality, role, and appearance on the website. Each brick can be considered a React component that you can assemble in various ways to build your interface.
React Features
React boasts amazing features that make it one of the best choices for modern web designs. The following are some worth-mentioning features:
- Component-based: React allows you to break your UI into multiple independent and reusable components.
- Declarative: You can describe how your UI should look, and React updates the DOM automatically based on your declaration.
- Virtual DOM: It is a lightweight copy of actual DOM that React uses to batch updates and re-render only the necessary parts of the UI.
- JSX: JSX is a syntax extension that allows you to define JS expressions directly within the HTML.
Benefits of Using React
React serves a lot of benefits when it comes to interactive UIs:
- Reusability: React allows you to define and reuse the components.
- Maintainability: The maintainability of your code is enhanced as changes to one component do not affect other components.
- Performance: The performance of interactive components is enhanced due to the virtual DOM.
- Large and Active Community: React has vast resources, libraries, and a huge community to support and help developers.
- HTML, CSS and JavaScript: You must acquire a basic understanding of these web technologies as React is based on them.
- Node.js: It is a popular JS run-time environment enabling you to run your code outside the browser.
- npm/yarn: The npm/yarn is a package manager used to install and manage the packages and dependencies.
Setting Up Development Environment
Before starting with the React code, you must set up your development environment. You must fulfil some prerequisites to work with React.
Prerequisites
You already have acquired HTML, CSS, and JavaScript skills, so we can skip that part. Next, we have to install the Node.js and npm.
Installing Node.js
• Go to the NodeJS official site.
• Click on the Download Node.js button.
Ensure to install the latest version.
• Follow the instructions on the setup wizard and install it.
Please note that npm is part of NodeJs components and is installed automatically.
Creating the First React Project
Once you have successfully installed NodeJS and other required components, you are all set to start creating the React projects. You can do it either from the NodeJS app or the command prompt using CRA (Create React Application).
CRA is a simple command-line tool that creates new React applications with default configurations. As a beginner, it is better to do it with CRA since creating projects from NodeJS application requires some configuration, which is handled automatically in the case of CMD.
To create a new project, open your terminal or command prompt and run the following command:
npx create-react-app first-project
In the above command,
• npx is the package runner.
• Create-react-app is the command to create a new project, and
• first_project is the project name.
When the command completes, go to your project directory with the following command:
cd first-project
After running this command, you will see the project hierarchy, which we will understand in the following section.
Understanding the Project Structure and Hierarchy
Since our first React project is up and running, let’s take some time to learn about its structure and the files our project folder contains:
• node_modules: This folder contains all the necessary packages and libraries to run your React projects. Ensure not to delete any files or folders from this folder.
• public: This folder contains the public files run directly on the web servers. It includes the index.html, images and other resources.
• src: Most of your React code resides in this folder. We’ll work the most with the files in this folder. Some of the most important files include:
o index.js: It is the first JS file that is executed. It is responsible for rendering the React components into the browser’s DOM.
o App.js: Serves as a container for other components. This file is the basic building block of the user interface.
o index.css: This is the global stylesheet for your applications.
o App.css: The stylesheet for the App component.
• package.json: The project metadata is stored within this file. It includes your project name, version, scripts and dependencies.
• Package-lock.json: This file contains the actual versions of the dependencies used in a project. It also ensures consistent installations across different environments.
Currently, our main focus would be the src folder and index.js and App.js files.
Creating your First React Component
Now, it’s time to create your first React component. A component in React could be as simple as a button or complex as an entire website. There are 2 types of React components:
i. Functional Components: It is a JavaScript function that returns JSX.
ii. Class Components: These are the ES6 components that are extended from the React.Component and React.PureComponent.
We normally use the functional components as they are easy to understand and use. That being said, let’s open the App.js in a code editor and create our first component.
- Open the App.js file in a code editor.
- Enter the following code:
function App() {
  return (
    <div>
      <h1>Hello, World!</h1>
      <p>This is my first React project.</p>
    </div>
  );
}

export default App;
In the above code:
- App() is the functional component that returns a piece of JSX code.
- The return statement tells to render the component.
- The export default App makes the component reusable in other parts of the application.
Please note that the code that looks like HTML is actually JSX (JavaScript XML).
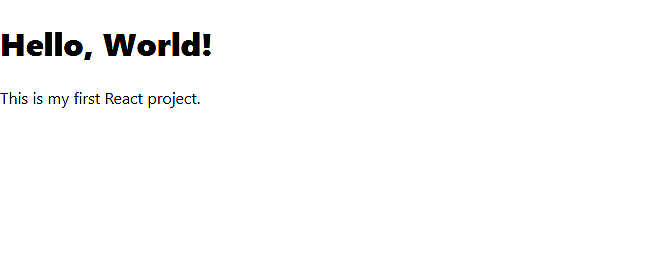
Component in Action
To see your component in action, go the terminal or command prompt and run the following command:
start npm
After some processing, your browser should launch automatically and you should see the output of your code.
That’s it for now. We’ll continue our next article with learning some JSX rules and then start working with Props.