<div class="container mt-4">
    <h2 class="mb-3">jQuery Event Functions – Contd.</h2>
    <table class="table table-bordered table-striped">
        <thead class="table-dark">
            <tr>
                <th>Event</th>
                <th>Example</th>
            </tr>
        </thead>
        <tbody>
            <tr>
                <td><code>.moseenter()</code></td>
                <td><code>$("#head_div").mouseenter(function() { alert("Mouse Entered!"); });</code></td>
            </tr>
            <tr>
                <td><code>.mouseleave()</code></td>
                <td><code>$("#btn").mouseleave(function() { alert("Mouse Left!"); });</code></td>
            </tr>
            <tr>
                <td><code>.mousedown()</code></td>
                <td><code>$("#btn").mousedown(function() { alert("You have clicked!"); });</code></td>
            </tr>
            <tr>
                <td><code>.mousedown()</code></td>
                <td><code>$(":text").mousedown(function() { alert("You have left the click!"); });</code></td>
            </tr>
            <tr>
                <td><code>.keypress()</code></td>
                <td><code>$(":text").keypress(function() { alert("Key Pressed!"); });</code></td>
            </tr>
            <tr>
                <td><code>.keyup()</code></td>
                <td><code>$(":text").keyup(function() { alert("Key Left!"); });</code></td>
            </tr>
            <tr>
                <td><code>.keydown()</code></td>
                <td><code>$(":text").keydown(function() { alert("You are holding the key!"); });</code></td>
            </tr>
            <tr>
                <td><code>.keypress()</code></td>
                <td><code>$(":text").keypress(function() { alert("Key Pressed!"); });</code></td>
            </tr>
<tr>
                <td><code>.submit()</code></td>
                <td><code>$("form ").submit(function() { alert("Submitted!"); });</code></td>
            </tr>
<tr>
                <td><code>.change()</code></td>
                <td><code>$("#user_input ").change(function() { alert("Changed!"); });</code></td>
            </tr>
<tr>
                <td><code>.focus()</code></td>
                <td><code>$("#user_input ").focus(function() { alert("Focused!"); });</code></td>
            </tr>
<tr>
                <td><code>.resize()</code></td>
                <td><code>$("window ").resize(function() { alert("Resized!"); });</code></td>
            </tr>
<tr>
                <td><code>.scroll()</code></td>
                <td><code>$("window ").scroll(function() { alert("Scrolled!"); });</code></td>
            </tr>
<tr>
                <td><code>.unload()</code></td>
                <td><code>$("window ").unload(function() { alert("Unloaded!"); });</code></td>
            </tr>
        </tbody>
    </table>
</div>
jQuery Effects
jQuery effects allow you to add animations, show/hide elements, and make your webpage more interactive. Let's explore different jQuery Effects:
1. .hide()
The .hide() function is used to hide an element.
Example:
$(document).ready(function(){
	$("#hide").click(function(){
		$("#blue").hide();
	});
});
2. .show():
The .show() function displays a hidden element on the screen.
Example:
$(document).ready(function(){
	$("#show").click(function(){
		$("#blue").show();
	});
});
3. .toggle():
The .toggle() function hides an object at one click and shows it at the other.
Example:
$(document).ready(function(){
	$("#toggle").click(function(){
		$("#blue").toggle();
	});
});
4. .fadeIn():
The .fadeIn() effect shows a hidden element with a fading effect. The element must be hidden in advance for this function to work.
Example:
$(document).ready(function(){
	$("#faded").click(function(){
		$("#red").fadeIn();
	});
});
You can also specify the speed for the effect or call another function. The valid values are "slow," "fast," or time in milliseconds.
Example:
$(document).ready(function(){
	$("#faded").click(function(){
		$("#red").fadeIn("slow");
	});
});
5. .fadeOut():
The .fadeOut() method allows you to hide an element with a fading effect.
Example:
$(document).ready(function(){
	$("#hide").click(function(){
		$("#red").fadeOut();
	});
});
Like .fadeIn(), you can specify the speed of the effect using the "slow," "fast," and time in milliseconds.
$(document).ready(function(){
	$("#hide").click(function(){
		$("#red").fadeOut("slow");
	});
});
6. .fadeToggle():
The .fadeToggle() function fades out an object on one click and fades it in on the other.
Example:
$(document).ready(function(){
	$("#toggle").click(function(){
		$("#red").fadeToggle("slow");
	});
});
7. .fadeTo():
The .fadeTo() method allows you to specify a specific opacity to which you would like to fade an element. The speed and opacity parameters are required in this function, whereas the callback function is optional. The value for the opacity could lie between 0 and 1.
Example:
$(document).ready(function(){
	$("#toggle").click(function(){
		$("#red").fadeToggle("slow");
	});
});
8. .slideDown():
The .slideDown() effect slides a hidden element down on the screen.
Example:
$(document).ready(function(){
	$("#show").click(function(){
		$("#hidden").slideDown("slow");
	});
});
9. .slideUp():
This function hides an element with a sliding effect:
Example:
$(document).ready(function(){
	$("#hide").click(function(){
		$("#visible").slideUp("slow");
	});
});
10. .slideToggle():
Slide an object up on one click and down on the other with the slideToggle() function.
Example:
$(document).ready(function(){
	$("#toggle").click(function(){
		$("#my_div").slideToggle("slow");
	});
});
11. .animate():
With .animate() method, you can create custom animations. This method allows you to manipulate any CSS properties except for those with colors.
Example:
$(document).ready(function(){
	$("#animate_div").click(function(){
		$("#animated").animate({
		height: '10px',opacity: '0.4'}, "slow");
	});
});
12. .stop():
The .stop() function is used to stop an animation while it is playing.
Example:
$(document).ready(function(){
	$("#animate_div").click(function(){
		$("#animated").animate({
		height: '10px',opacity: '0.4'}, 5000);
	});

	$("#stop"). click(function(){
		$("#animated").stop();
	});
});
Besides these, there are numerous jQuery functions that you can use to make your webpage more interactive and amazing, but those would be too high level for beginners.
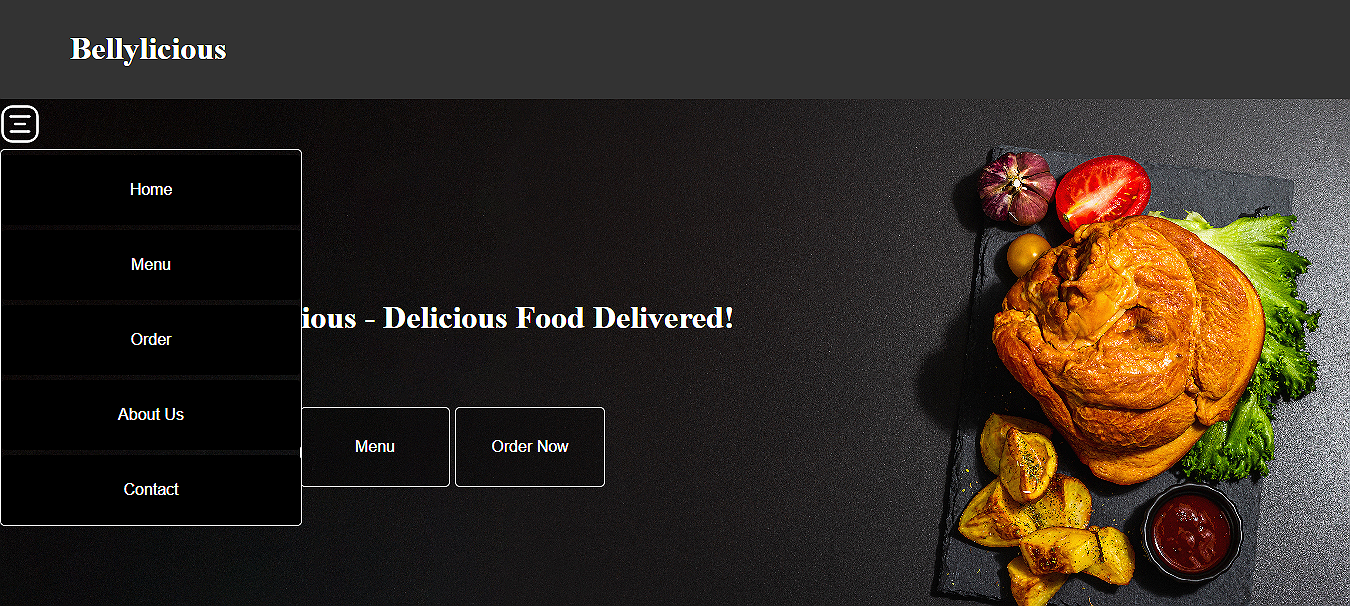
Implementing jQuery in Bellylicious Home Page - Practice
Now that you have learned the most used jQuery functions, it's time to put it into practice. Do you remember we created a simple webpage in our HTML and CSS tutorials?
Let's make some changes to that webpage and make the navigation menu collapsable with jQuery.
Redefining the Nav Bar
Before making any changes to the code, I recommend you create a new HTML file and add all the HTML code into it to avoid losing your actual webpage.
Once done, head over to the header div and comment out the nav div.
<!--Navigation-->
		<!--<div class="nav">
				<a href="#"><button class="nav_btn">Home</button></a>
				<button class="nav_btn">Menu </button>
				<button class="nav_btn">Order</button>
				<button class="nav_btn">About Us</button>
				<button class="nav_btn">Contact</button>
			</div>-->
Let's define a sidebar toggle button below the header:
<div class="toggle_nav"></div>
Style it as follows:
.toggle_nav{
	width: 40px;
	height: 40px;
	background-image: url("images/hamburger.svg");
	background-size: cover;
	position: absolute;
	margin-left: 15px;
	margin-top: 5px;
}
Once done, create a sidebar for navigation. We'll create a div and define our navigation buttons within it.
<div class="side_menu">
			<button class="side_btn">Home</button>
			<button class="side_btn">Menu</button>
			<button class="side_btn">Order</button>
			<button class="side_btn">About Us</button>
			<button class="side_btn">Contact</button>
		</div>
We will set the sidebar's height as auto so it automatically grows when we add more items:
.side_menu{
	width: 300px;
	height: auto;
	position: absolute;
	margin-top: 50px;
	border: 1px solid white;
	border-radius: 5px;
}

.side_btn{
	width: 100%;
	height: 70px;
	margin-top: 5px;
	background-color: black;
	border: 0px;
	border-radius: 5px;
	color: white;
	font-size: 16px;
	text-align: center;
}
Here's how our sidebar looks right now:
Let's also add a hover effect on the sidebar items:
.side_btn:hover{
	border: 2px, solid, black;
	background-color: white;
	color: black;
	font-weight: bold;
}
Now, our sidebar looks perfect.

Now that our sidebar is all set, we will make it toggleable in the next article with jQuery.