This article describes, how to perform basic CRUD operations in an MVC5 application using Entity Framework 6 and Kendo UI.
We will use following Kendo UI components
1. Kendo Grid to show all Employee details.
2. Kendo window to Perform add and Edit operations.
Create Domain Model using Database First workflow
Step 1. Create a database and some table.
Open SSMS and using visual designer create a database , name it as Organization and create two tables called Employee and Department. If you are not a fan of visual designer and prefer SQL script to generate Database and tables, then copy and paste below code as a new query and run the script.
 Create database Organization
   go
   use Organization
   go
  CREATE TABLE [dbo].[Department] (
    [Id]   INT          IDENTITY (1, 1) NOT NULL,
    [Name] VARCHAR (50) NULL,
    CONSTRAINT [PK_Department] PRIMARY KEY CLUSTERED ([Id] ASC)
  );

  CREATE TABLE [dbo].[Employee] (
    [Id]           INT          IDENTITY (1, 1) NOT NULL,
    [Name]         VARCHAR (50) NULL,
    [Salary]       INT          NULL,
    [DepartmentId] INT          NULL,
    CONSTRAINT [PK_Employee] PRIMARY KEY CLUSTERED ([Id] ASC),
    CONSTRAINT [FK_Employee_Department] FOREIGN KEY ([DepartmentId]) REFERENCES [dbo].[Department] ([Id])
  );
Step 2.Go to visual studio and create a new project , Name it as DatabaseFirstDemo
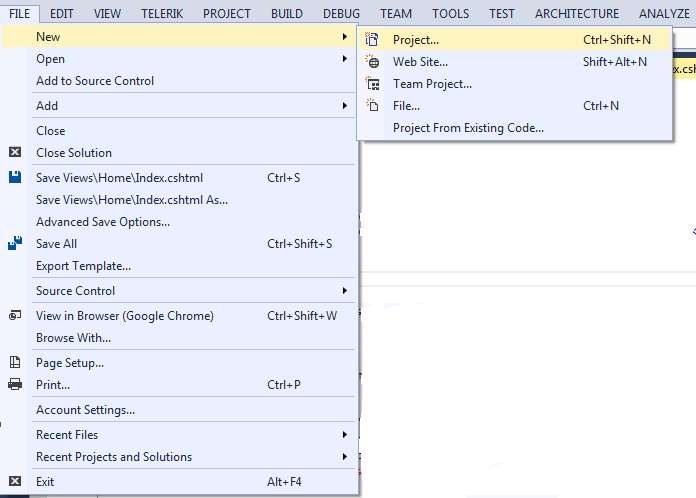
• Open visual studio.
• Go to Files ---->New---->Project
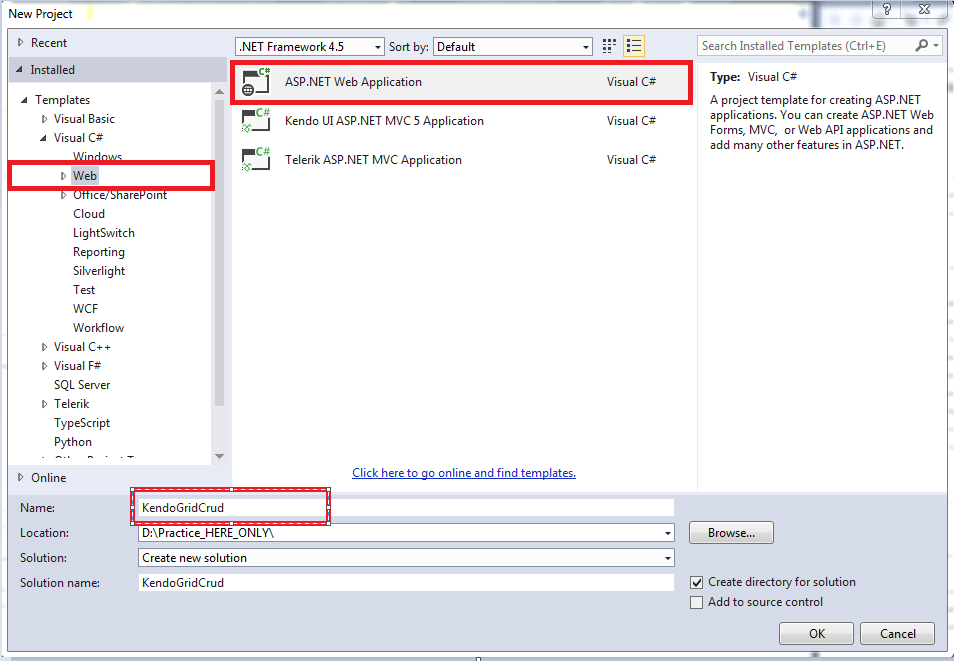
• Under New Project window select Web application.
• Give the project a name (KendoGridCrud)
• Click Ok
Step 3.Install Entity Framework.
With the new project the first step is to Install EF. To do that , we use package manager console.

• Go to Tools.
• Select Nuget Package Manger and Then Package Manager Console.
• Install Entity Framework using the install-package command.
Install-Package EntityFramework -Version 6.2.0

Step 4. Add Ado.Net Entity Data Model.
• Right Click on the Models folder of your project.
• Add ----> Add New Item.
• Under Add new Item window select Data tab and under that select Ado.Net Entity Data Model and click Add.


This is going to be our conceptual Model that represents the mapping between our database tables and domain classes. I have given it a meaningful name as OrganizationModel.
• Under the Entity Data Model wizard, select EF Designer From database , cause we already have a database and click next.

• In the next window select or specify the connection to your database.
1. Specify Server Name
2. Choose Database.
3. Test the connection and
4. Click Ok.

• Change the connection name to OrganizationDbContext and click on Next.

• In the next window select your table and give the model namespace a meaningful name as OrganizationModel and click finish.
Notice :- At this point EF looks at our database and displays the tables, views , stored procedure and Functions , currently we only had tables so we just ticked the table and left the rest as is.

At this point , you will get a security warning like "Running this template can harm your computer" , don't worry about it and just click next. It gives us the warning because visual studio tries to run a template to generate the code.

Unfolding Edmx

EF generates domain models by running some templates, these templates are present under an edmx file, the extension of templates is .tt. Let's uncover these templates. As you Notice in the above figure, we have two templates.
1. OrganizationModel.Context.tt and
2. OrganizationModel.tt
Here the "tt" stands for template , the first template is responsible for generating DbContext and DBSet while the second template is responsible for generating our domain Entities. This is the reason when you expand the first template that is your context.tt you will find your DbContext class, similarly on expanding Model.tt you will find all your domain Entities.


DbContext Class
At this point, if we expand our context class, we see the actual generated code. This is a plain C# code that EF generates for us. This class derives from the DbContext, so we call it our context class. Remember DbContext is an abstraction over the database. It provides a simple API to load the data from a database or save data to the database.
It has properties of type DbSet. A DbSet represents a Table in our Database. As in our database we had two tables Employee and Department, EF generated two Dbset namely DbSet of Employee and DbSet of Department.

Domain Classes
On expanding the other template that is model.tt we can see our domain Entities. Each domain Entities has properties based on our table columns.


Create methods for Create, Read, Update and Delete operations
public class HomeController : Controller
    {
        //
        // GET: /Home/
        public ActionResult Index()
        {
            return View();
        }
        public ActionResult GetEmployees(DataSourceRequest req)
        {
            OrganizationDbContext db = new OrganizationDbContext();
            List<GridVM> gvms = new List<GridVM>();
             gvms = (from a in db.Employees
                       join b in db.Departments
                       on a.DepartmentId equals b.Id
                       select new GridVM
                       {
                        Id=a.Id,
                       Name= a.Name,
                        Salary=a.Salary,
                       Department= b.Name
                    }).ToList();

             return Json(gvms.ToDataSourceResult(req), JsonRequestBehavior.AllowGet);
        }


        public void AddEmployee(Employee emp)
        {
            OrganizationDbContext db = new OrganizationDbContext();
            db.Employees.Add(emp);
            db.SaveChanges();
        }
        public void UpdateEmployee(Employee emp)
        {
            OrganizationDbContext db = new OrganizationDbContext();
            Employee objToUpdate = db.Employees.Find(emp.Id);
            objToUpdate.Name = emp.Name;
            objToUpdate.Salary = emp.Salary;
            objToUpdate.DepartmentId = emp.DepartmentId;

            db.Entry(objToUpdate).State = EntityState.Modified;
            db.SaveChanges();
        }
        public void DeleteEmployee(Employee emp)
        {
            OrganizationDbContext db = new OrganizationDbContext();
            Employee objToDelete = db.Employees.Find(emp.Id);
            db.Employees.Remove(objToDelete);
            db.SaveChanges();
        }
	}
Create a ViewModel for Grid
public class GridVM
    {
        public int Id { get; set; }
        public string Name { get; set; }
        public int? Salary { get; set; }
        public string Department { get; set; }
    }
Add Index View and Configure Kendo Grid

@(Html.Kendo().Grid<KendoExamples.ViewModel.GridVM>()
            .Name("grid")
            .Columns(columns =>
            {
                columns.Bound(c => c.Id).Title("Id").Visible(false);
                columns.Bound(c => c.Name).Title("Name").Width(150);
                columns.Bound(c => c.Salary).Title("Salary").Width(150).Filterable(false);
                columns.Bound(c => c.Department).Title("Department").Width(150).Filterable(false);


                columns.Command(command => command.Custom("Edit").Click("editDetails")).Title("Modify").Width(30);
                columns.Command(c => { c.Destroy(); }).Title("Remove").Width(30);

            }).HtmlAttributes(new { style = "height: 550px;" })
                           .Sortable()
                    .Filterable()
                .DataSource(dataSource => dataSource
                .Ajax()
                .Model(model => model.Id(p => p.Id))
                .PageSize(5)
                                                 .Create(update => update.Action("AddEmployee", "Home"))
                                               .Update(update => update.Action("UpdateEmployee", "Home"))
                                                .Read(read => read.Action("GetEmployees", "Home"))
                                          .Destroy(destroy => destroy.Action("DeleteEmployee", "Home"))
                )
                 .Resizable(resize => resize
                 .Columns(true)
              )

               .ToolBar(toolbar =>
                {
                    toolbar.Custom().Name("newAdd").Text("+ Add Employee ").Url("#").HtmlAttributes(new { id = "newAdd" });

                })


                .Pageable(pageable =>
                {
                    pageable.Refresh(true);
                    pageable.PageSizes(true);
                })
)
Create Form for Adding details using Kendo Window
<div class="col-md-12">
    @(Html.Kendo().Window().Name("AddDetails")
        .Title("Add Employee")
        .Visible(false)
        .Modal(true)
        .Content(@<text>
            <div style="width:100%;" id="fieldlist">
                <form id="Addform">
                    <div id="save-container">
                        <div class="col-md-12">
                            <div class="col-md-6">
                                @Html.Label("Name :", htmlAttributes: new { @class = "control-label" })
                            </div>
                            <div class="col-md-6">
                                @(Html.Kendo().TextBox()
                             .Name("txtName")
                             .HtmlAttributes(new { placeholder = "Enter Name", required = "required",
   validationmessage = "*", maxlength = "50", @class = "col-sm-2 form-control", style = "width:
    100%", })
                                )
                            </div>
                            <div class="col-md-6">
                                @Html.Label("Salary :", htmlAttributes: new { @class = "control-label" })
                            </div>
                            <div class="col-md-6">
                                @(Html.Kendo().NumericTextBox()
                             .Name("txtSalary")
                             .HtmlAttributes(new { placeholder = "Enter Salary", required = "required",
   validationmessage = "*", maxlength = "50", @class = "col-sm-2 form-control", style = "width:
   100%" })
                                )
                            </div>
                        </div>
                        <div class="clarfix" style="height:35px"></div>
                        <div class="col-md-12">
                            <div class="col-md-6">
                                @Html.Label("Department :", htmlAttributes: new { @class = "control-label"
      })
                            </div>
                            <div class="col-md-6">
                                @(Html.Kendo().DropDownList()
                                .OptionLabel("select category")
                            .Name("ddlDepartment")
                                    .DataTextField("Name")
                            .DataValueField("Id").HtmlAttributes(new { required = "required",
        validationmessage = "*" })
                            .DataSource(source =>
        {
            source.Read(read =>
            {
                read.Action("GetCategory", "Home");
            });
        })
          .HtmlAttributes(new { style = "width: 100%" })
                                )
                            </div>


                        <div class="row" style="margin-top:20px"></div>
                        <div class="row" style="text-align:center;margin-top:10px;left:20px;">
                            @(Html.Kendo().Button()
                    .Name("btnSave")
                    .Content("Save")
                                    .HtmlAttributes(new { type = "button", @class = "k-button k-primary",
     style = "height:35px;width:70px;" })
                    .Events(e => e.Click("btnSave_Click"))
                            )
                            @(Html.Kendo().Button()
                    .Name("btnReset")
                    .Content("Reset")
                                    .HtmlAttributes(new { type = "button", @class = "k-button k-primary",
   style = "height:35px;width:70px;" })
                    .Events(e => e.Click("btnReset_Click"))
                            )
                        </div>

                    </div>
                   </div>

                </form>

            </div>
        </text>)
        .Draggable(true) //Enable dragging of the window
         .Actions(actions => actions.Pin().Minimize().Maximize().Close()).Resizable() //Enable
   resizing of the window
         .Width(980)     //Set width of the window
         .Height(300)
    )
  </div>
Create GetCategory() method in Home Controller which will be used as data source for Binding the Department dropdownlist
  public ActionResult GetCategory()
        {
            OrganizationDbContext db = new OrganizationDbContext();
            var res= db.Departments.Select(x=>new {
            Id=x.Id,
            Name=x.Name
            });

            return Json(res, JsonRequestBehavior.AllowGet);
        }
Create Form for Editing details using Kendo Window
   <div class="col-md-12">
    @(Html.Kendo().Window().Name("EditDetails")
        .Title("Edit Employee")
        .Visible(false)
        .Modal(true)
        .Content(@<text>
            <div style="width:100%;" id="fieldlist">

                <form id="Editform">
                    <div id="Update-container">
                        <div class="col-md-12">
                            @Html.Hidden("txtId")
                            <div class="col-md-6">
                                @Html.Label("Name :", htmlAttributes: new { @class = "control-label" })
                            </div>
                            <div class="col-md-6">
                                @(Html.Kendo().TextBox()
                             .Name("txtName1")
                             .HtmlAttributes(new { placeholder = "Enter Name", required = "required", validationmessage = "*", maxlength = "50", @class = "col-sm-2 form-control", style = "width: 100%", })
                                )
                            </div>
                            <div class="col-md-6">
                                @Html.Label("Salary :", htmlAttributes: new { @class = "control-label" })
                            </div>
                            <div class="col-md-6">
                                @(Html.Kendo().NumericTextBox()
                             .Name("txtSalary1")
                             .HtmlAttributes(new { placeholder = "Enter Salary", required = "required", validationmessage = "*", maxlength = "50", @class = "col-sm-2 form-control", style = "width: 100%" })
                                )
                            </div>
                        </div>
                        <div class="clarfix" style="height:35px"></div>
                        <div class="col-md-12">
                            <div class="col-md-6">
                                @Html.Label("Department :", htmlAttributes: new { @class = "control-label" })
                            </div>
                            <div class="col-md-6">
                                @(Html.Kendo().DropDownList()
                                .OptionLabel("select category")
                            .Name("ddlDepartment1")
                                    .DataTextField("Name")
                            .DataValueField("Id").HtmlAttributes(new { required = "required", validationmessage = "*" })
                            .DataSource(source =>
        {
            source.Read(read =>
            {
                read.Action("GetCategory", "Home");
            });
        })


          .HtmlAttributes(new { style = "width: 100%" })
                                )
                            </div>


                            <div class="row" style="margin-top:20px"></div>
                            <div class="row" style="text-align:center;margin-top:10px;left:20px;">
                                @(Html.Kendo().Button()
                    .Name("btnUpdate")
                    .Content("Update")
                                    .HtmlAttributes(new { type = "button", @class = "k-button k-primary", style = "height:35px;width:70px;" })
                    .Events(e => e.Click("btnUpdate_Click"))
                                )
                                @(Html.Kendo().Button()
                    .Name("btnUpdateReset")
                    .Content("Reset")
                                    .HtmlAttributes(new { type = "button", @class = "k-button k-primary", style = "height:35px;width:70px;" })
                    .Events(e => e.Click("btnUpdateReset_Click"))
                                )
                            </div>

                        </div>
                    </div>

                </form>

            </div>
        </text>)
                                            .Draggable(true) //Enable dragging of the window
                                             .Actions(actions => actions.Pin().Minimize().Maximize().Close()).Resizable() //Enable resizing of the window
                                             .Width(980)     //Set width of the window
                                             .Height(250)

    )


</div>
Open AddDetails Window when "Add New" Custom command of Grid is clicked
  <script>
  $("#newAdd").click(function (e) {
        debugger
        e.preventDefault();
        $("#AddDetails").data("kendoWindow").center().open();
        $("#newAdd").show();
        $("#btnSave").kendoButton({}).data("kendoButton").enable(true);

    });
 </script>
Open EditDetails window when Edit Command of Grid is clicked
 <script>
 function editDetails(e) {
        debugger
        e.preventDefault();
        var wnd = $("#EditDetails").data("kendoWindow");
        var dataItem = this.dataItem($(e.currentTarget).closest("tr"));
        $("#txtId").val(dataItem.Id);
        $("#txtName1").val(dataItem.Name);
        $('#txtSalary1').data("kendoNumericTextBox").value(dataItem.Salary);
        $("#ddlDepartment1").data("kendoDropDownList").text(dataItem.Department);
        $("#btnUpdate").kendoButton({}).data("kendoButton").enable(true);
        wnd.center().open();
    }
 </script>
Send data to controller when button "btnSave" is clicked for creating a new Employee
    function btnSave_Click() {
        debugger
        var validator = $("#save-container").kendoValidator().data("kendoValidator");
        if (validator.validate()) {

            var employeeModel = {
                Name: $('#txtName').val(),
                Salary: $('#txtSalary').val(),
                DepartmentId: $('#ddlDepartment').val(),


            }
            var model = {
                "emp": employeeModel
            }
            $.ajax({
                type: "POST",
                url: '/Home/AddEmployee', data: model,
                datatype: "json",
                cache: false,
                success: function (data) {

                },

            });
            btnReset_Click();
            var wnd = $("#AddDetails").data("kendoWindow");
            wnd.center().close();
            alert("Record save is successfully!");
            var grid = $('#grid').data('kendoGrid');
            grid.dataSource.read();
            return true;
        }
        else {
            return false;
        }
    }
Reset Fields: clear all fields if the Reset button is clicked while saving new record or go to previous records while editing records
function btnReset_Click() {
        debugger
        $("#ddlDepartment").data('kendoDropDownList').value(-1);

        $("#txtName").val("")
        $('#txtSalary').data("kendoNumericTextBox").value(null);


        $("#btnSave").kendoButton({}).data("kendoButton").enable(true);
        var wnd = $("#AddDetails").data("kendoWindow");
        wnd.element.find("span.k-tooltip-validation").hide();
        return;
    }
    function btnUpdateReset_Click() {
        debugger

        var Id = $("#txtId1").val();
        var dataItem = $("#grid").data("kendoGrid").dataSource.get(Id);
        $("#ddlDepartment1").val(dataItem.Department).data("kendoDropDownList").value(dataItem.Department)
        $("#txtName1").val(dataItem.Name)
        $("#txtSalary1").val(dataItem.Salary)

        $("#btnUpdate").kendoButton({}).data("kendoButton").enable(true);
        return;
    }
Send data to controller when button "btnUpdate" is clicked
    function btnUpdate_Click() {
        debugger
        var validator = $("#Update-container").kendoValidator().data("kendoValidator");
        if (validator.validate()) {

            var employeeModel = {
                Id:$("#txtId").val(),
                Name: $('#txtName1').val(),
                Salary: $('#txtSalary1').val(),
                DepartmentId: $('#ddlDepartment1').val(),


            }
            var model = {
                "emp": employeeModel
            }
            $.ajax({
                type: "POST",
                url: '/Home/UpdateEmployee', data: model,
                datatype: "json",
                cache: false,
                success: function (data) {

                },

            });
            btnReset_Click();
            var wnd = $("#EditDetails").data("kendoWindow");
            wnd.center().close();
            alert("Record updated successfully!");
            var grid = $('#grid').data('kendoGrid');
            grid.dataSource.read();
            return true;
        }
        else {
            return false;
        }
    }
The complete code for view is shown below.
@{
ViewBag.Title = "Index";
}
Index
@using Kendo.Mvc.UI;
@model KendoExamples.ViewModel.GridVM
@{
ViewBag.Title = "GridShow";
}
@(Html.Kendo().Grid()
.Name("grid")
.Columns(columns =>
{
columns.Bound(c => c.Id).Title("Id").Visible(false);
columns.Bound(c => c.Name).Title("Name").Width(150);
columns.Bound(c => c.Salary).Title("Salary").Width(150).Filterable(false);
columns.Bound(c => c.Department).Title("Department").Width(150).Filterable(false);
columns.Command(command => command.Custom("Edit").Click("editDetails")).Title("Modify").Width(30);
columns.Command(c => { c.Destroy(); }).Title("Remove").Width(30);
}).HtmlAttributes(new { style = "height: 550px;" })
.Sortable()
.Filterable()
.DataSource(dataSource => dataSource
.Ajax()
.Model(model => model.Id(p => p.Id))
.PageSize(5)
.Create(update => update.Action("AddEmployee", "Home"))
.Update(update => update.Action("UpdateEmployee", "Home"))
.Read(read => read.Action("GetEmployees", "Home"))
.Destroy(destroy => destroy.Action("DeleteEmployee", "Home"))
)
.Resizable(resize => resize
.Columns(true)
)
.ToolBar(toolbar =>
{
toolbar.Custom().Name("newAdd").Text("+ Add Employee ").Url("#").HtmlAttributes(new { id = "newAdd" });
})
.Pageable(pageable =>
{
pageable.Refresh(true);
pageable.PageSizes(true);
})
)
<div class="col-md-12">
@(Html.Kendo().Window().Name("AddDetails")
.Title("Add Employee")
.Visible(false)
.Modal(true)
.Content(@<text>
<div style="width:100%;" id="fieldlist">
<form id="Addform">
<div id="save-container">
<div class="col-md-12">
<div class="col-md-6">
@Html.Label("Name :", htmlAttributes: new { @class = "control-label" })
</div>
<div class="col-md-6">
@(Html.Kendo().TextBox()
.Name("txtName")
.HtmlAttributes(new { placeholder = "Enter Name", required = "required", validationmessage = "*", maxlength = "50", @class = "col-sm-2 form-control", style = "width: 100%", })
)
</div>
<div class="col-md-6">
@Html.Label("Salary :", htmlAttributes: new { @class = "control-label" })
</div>
<div class="col-md-6">
@(Html.Kendo().NumericTextBox()
.Name("txtSalary")
.HtmlAttributes(new { placeholder = "Enter Salary", required = "required", validationmessage = "*", maxlength = "50", @class = "col-sm-2 form-control", style = "width: 100%" })
)
</div>
</div>
<div class="clarfix" style="height:35px"></div>
<div class="col-md-12">
<div class="col-md-6">
@Html.Label("Department :", htmlAttributes: new { @class = "control-label" })
</div>
<div class="col-md-6">
@(Html.Kendo().DropDownList()
.OptionLabel("select category")
.Name("ddlDepartment")
.DataTextField("Name")
.DataValueField("Id").HtmlAttributes(new { required = "required", validationmessage = "*" })
.DataSource(source =>
{
source.Read(read =>
{
read.Action("GetCategory", "Home");
});
})
.HtmlAttributes(new { style = "width: 100%" })
)
</div>
<div class="row" style="margin-top:20px"></div>
<div class="row" style="text-align:center;margin-top:10px;left:20px;">
@(Html.Kendo().Button()
.Name("btnSave")
.Content("Save")
.HtmlAttributes(new { type = "button", @class = "k-button k-primary", style = "height:35px;width:70px;" })
.Events(e => e.Click("btnSave_Click"))
)
@(Html.Kendo().Button()
.Name("btnReset")
.Content("Reset")
.HtmlAttributes(new { type = "button", @class = "k-button k-primary", style = "height:35px;width:70px;" })
.Events(e => e.Click("btnReset_Click"))
)
</div>
</div>
</div>
</form>
</div>
</text>)
.Draggable(true) //Enable dragging of the window
.Actions(actions => actions.Pin().Minimize().Maximize().Close()).Resizable() //Enable resizing of the window
.Width(980) //Set width of the window
.Height(300)
)
</div>
<div class="col-md-12">
@(Html.Kendo().Window().Name("EditDetails")
.Title("Edit Employee")
.Visible(false)
.Modal(true)
.Content(@<text>
<div style="width:100%;" id="fieldlist">
<form id="Editform">
<div id="Update-container">
<div class="col-md-12">
@Html.Hidden("txtId")
<div class="col-md-6">
@Html.Label("Name :", htmlAttributes: new { @class = "control-label" })
</div>
<div class="col-md-6">
@(Html.Kendo().TextBox()
.Name("txtName1")
.HtmlAttributes(new { placeholder = "Enter Name", required = "required", validationmessage = "*", maxlength = "50", @class = "col-sm-2 form-control", style = "width: 100%", })
)
</div>
<div class="col-md-6">
@Html.Label("Salary :", htmlAttributes: new { @class = "control-label" })
</div>
<div class="col-md-6">
@(Html.Kendo().NumericTextBox()
.Name("txtSalary1")
.HtmlAttributes(new { placeholder = "Enter Salary", required = "required", validationmessage = "*", maxlength = "50", @class = "col-sm-2 form-control", style = "width: 100%" })
)
</div>
</div>
<div class="clarfix" style="height:35px"></div>
<div class="col-md-12">
<div class="col-md-6">
@Html.Label("Department :", htmlAttributes: new { @class = "control-label" })
</div>
<div class="col-md-6">
@(Html.Kendo().DropDownList()
.OptionLabel("select category")
.Name("ddlDepartment1")
.DataTextField("Name")
.DataValueField("Id").HtmlAttributes(new { required = "required", validationmessage = "*" })
.DataSource(source =>
{
source.Read(read =>
{
read.Action("GetCategory", "Home");
});
})
.HtmlAttributes(new { style = "width: 100%" })
)
</div>
<div class="row" style="margin-top:20px"></div>
<div class="row" style="text-align:center;margin-top:10px;left:20px;">
@(Html.Kendo().Button()
.Name("btnUpdate")
.Content("Update")
.HtmlAttributes(new { type = "button", @class = "k-button k-primary", style = "height:35px;width:70px;" })
.Events(e => e.Click("btnUpdate_Click"))
)
@(Html.Kendo().Button()
.Name("btnUpdateReset")
.Content("Reset")
.HtmlAttributes(new { type = "button", @class = "k-button k-primary", style = "height:35px;width:70px;" })
.Events(e => e.Click("btnUpdateReset_Click"))
)
</div>
</div>
</div>
</form>
</div>
</text>)
.Draggable(true) //Enable dragging of the window
.Actions(actions => actions.Pin().Minimize().Maximize().Close()).Resizable() //Enable resizing of the window
.Width(980) //Set width of the window
.Height(250)
)
</div>
<script>
$("#newAdd").click(function (e) {
debugger
e.preventDefault();
$("#AddDetails").data("kendoWindow").center().open();
$("#newAdd").show();
$("#btnSave").kendoButton({}).data("kendoButton").enable(true);
});
function btnSave_Click() {
debugger
var validator = $("#save-container").kendoValidator().data("kendoValidator");
if (validator.validate()) {
var employeeModel = {
Name: $('#txtName').val(),
Salary: $('#txtSalary').val(),
DepartmentId: $('#ddlDepartment').val(),
}
var model = {
"emp": employeeModel
}
$.ajax({
type: "POST",
url: '/Home/AddEmployee', data: model,
datatype: "json",
cache: false,
success: function (data) {
},
});
btnReset_Click();
var wnd = $("#AddDetails").data("kendoWindow");
wnd.center().close();
alert("Record save is successfully!");
var grid = $('#grid').data('kendoGrid');
grid.dataSource.read();
return true;
}
else {
return false;
}
}
function editDetails(e) {
debugger
e.preventDefault();
var wnd = $("#EditDetails").data("kendoWindow");
var dataItem = this.dataItem($(e.currentTarget).closest("tr"));
$("#txtId").val(dataItem.Id);
$("#txtName1").val(dataItem.Name);
$('#txtSalary1').data("kendoNumericTextBox").value(dataItem.Salary);
$("#ddlDepartment1").data("kendoDropDownList").text(dataItem.Department)
$("#btnUpdate").kendoButton({}).data("kendoButton").enable(true);
wnd.center().open();
}
function btnReset_Click() {
debugger
$("#ddlDepartment").data('kendoDropDownList').value(-1);
$("#txtName").val("")
$('#txtSalary').data("kendoNumericTextBox").value(null);
$("#btnSave").kendoButton({}).data("kendoButton").enable(true);
var wnd = $("#AddDetails").data("kendoWindow");
wnd.element.find("span.k-tooltip-validation").hide();
return;
}
function btnUpdateReset_Click() {
debugger
var Id = $("#txtId1").val();
var dataItem = $("#grid").data("kendoGrid").dataSource.get(Id);
$("#ddlDepartment1").val(dataItem.Department).data("kendoDropDownList").value(dataItem.Department)
$("#txtName1").val(dataItem.Name)
$("#txtSalary1").val(dataItem.Salary)
$("#btnUpdate").kendoButton({}).data("kendoButton").enable(true);
return;
}
function btnUpdate_Click() {
debugger
var validator = $("#Update-container").kendoValidator().data("kendoValidator");
if (validator.validate()) {
var employeeModel = {
Id:$("#txtId").val(),
Name: $('#txtName1').val(),
Salary: $('#txtSalary1').val(),
DepartmentId: $('#ddlDepartment1').val(),
}
var model = {
"emp": employeeModel
}
$.ajax({
type: "POST",
url: '/Home/UpdateEmployee', data: model,
datatype: "json",
cache: false,
success: function (data) {
},
});
btnReset_Click();
var wnd = $("#EditDetails").data("kendoWindow");
wnd.center().close();
alert("Record updated successfully!");
var grid = $('#grid').data('kendoGrid');
grid.dataSource.read();
return true;
}
else {
return false;
}
}
</script>
The complete code for controller is shown below,
public class HomeController : Controller
    {
        //
        // GET: /Home/
        public ActionResult Index()
        {
            return View();
        }
        public ActionResult GetEmployees(DataSourceRequest req)
        {
            OrganizationDbContext db = new OrganizationDbContext();
            List<GridVM> gvms = new List<GridVM>();
             gvms = (from a in db.Employees
                       join b in db.Departments
                       on a.DepartmentId equals b.Id
                       select new GridVM
                       {
                        Id=a.Id,
                       Name= a.Name,
                        Salary=a.Salary,
                       Department= b.Name
                    }).ToList();

             return Json(gvms.ToDataSourceResult(req), JsonRequestBehavior.AllowGet);
        }


        public ActionResult GetCategory()
        {
            OrganizationDbContext db = new OrganizationDbContext();
            var res= db.Departments.Select(x=>new {
            Id=x.Id,
            Name=x.Name
            });

            return Json(res, JsonRequestBehavior.AllowGet);
        }

        public void AddEmployee(Employee emp)
        {
            OrganizationDbContext db = new OrganizationDbContext();
            db.Employees.Add(emp);
            db.SaveChanges();
        }
        public void UpdateEmployee(Employee emp)
        {
            OrganizationDbContext db = new OrganizationDbContext();
            Employee objToUpdate = db.Employees.Find(emp.Id);
            objToUpdate.Name = emp.Name;
            objToUpdate.Salary = emp.Salary;
            objToUpdate.DepartmentId = emp.DepartmentId;

            db.Entry(objToUpdate).State = EntityState.Modified;
            db.SaveChanges();
        }
        public void DeleteEmployee(Employee emp)
        {
            OrganizationDbContext db = new OrganizationDbContext();
            Employee objToDelete = db.Employees.Find(emp.Id);
            db.Employees.Remove(objToDelete);
            db.SaveChanges();
        }
	}
Now Run the application and you will be able to perform all CRUD operations.